This post may contain affiliate links. As an amazon associate, I earn from qualifying purchases. See my full Disclosure Policy for details.
Keep cool this summer and save money with this super simple 3-ingredient Homemade Snow Cone Syrup recipe!

Pin this now to find it later
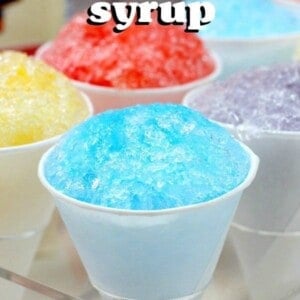
Pin ItSnow Cone Syrup recipe
I am ashamed to admit the amount of money our family has given to various ice cream trucks and shaved ice carts. Let’s be honest, all of that stuff is way overpriced …
Last year, our family decided it would be fun to add a cotton candy machine, popcorn popper, hot dog roller, and snow cone machine to our house. At first, I was kind of hesitant, because I had to find a place to put all of this stuff! Plus, would we really use this stuff?!
Surprisingly, the answer was yes! We use the popcorn popper, hot dog roller, and snow cone machine all of the time! Not so much on the cotton candy machine unless we’re having a party. We’ve actually had people comment that it’s like going to the carnival when they come over to our house … I can only assume they’re talking about all of the nifty gadgets and not the chaos!! ?
For quite awhile, we bought those big jugs of syrup off of Amazon – and while they’re great, it got so expensive!! I don’t like spending money on things I can get or make cheaper, so I decided to make our own Homemade Snow Cone Syrup.

You only need three ingredients to make this Homemade Snow Cone Syrup – water, sugar, and flavored drink mix packets of your choice. Easy peasy! The flavors I used were Cherry, Grape, Berry Blue, and Peach Mango.
Stronger flavor
If you prefer a sweeter mixture, you can up the sugar ratio … and likewise, if you prefer a less sweet mixture, you can use less sugar. I use an equal 1:1 ratio to make a simple syrup and add whatever flavor of drink mix we want. If you want a real flavor punch, use two packets of drink mix. Cherry and Lemonade are faves in our house!
One recipe perfectly fills up one of these bottles I bought off of Amazon. I love that the bottle has a cap to help keep them fresh in the fridge and prevent an accidental spill.
Would you like to save this?
Stored in the refrigerator, these Homemade Snow Cone Syrups will be good for about one month – but ours never last that long!

Other recipes you may enjoy

Homemade Snow Cone Syrup
Would you like to save this?
Ingredients
- 1 ½ cups water
- 1 ½ cups sugar
- 1 packet unsweetened drink mix, 0.23 oz.
Instructions
- In a small saucepan, bring sugar and water to a boil; simmer until the sugar is dissolved, 3 minutes.
- Stir in drink mix until well combined.
- Remove from the heat and let cool completely.
- Transfer syrup to a container for pouring.
- To serve, pour the desired amount of syrup over shaved ice to flavor.
Notes
- Use your imagination to make a bunch of flavors to get you through summer.
Nutrition
Nutrition information is automatically calculated, so should only be used as an approximation.


The features you’ve introduced are so practical!
Wondering what snow cone maker you have??? Can’t wait to try making our own syrup. We too spend way too much money buying over-priced snow cones!!
This is my Amazon affiliate link to the snow cone machine I use at home. Hope this helps – and I hope you enjoy the recipe!! 🙂
Such practical and thoughtful features!
Keep doing what you do best!
What a practical approach to solving these problems! Keep up the great work, you’re doing fantastic!
This article is extremely helpful and well-detailed!
Keep up the great work, you’re doing awesome!
Such practical and useful features!
This article is extremely helpful and well-detailed! It provides great insights and valuable information. Thank you for sharing such an informative and well-researched piece. Your efforts are truly appreciated!