This post may contain affiliate links. As an amazon associate, I earn from qualifying purchases. See my full Disclosure Policy for details.
Trust me! You should not be without Miracle Pan Release!

Pin this now to find it later
Pin ItMiracle Pan Release
If you bake a lot, then this Miracle Pan Release recipe is a must-have item in your pantry! It’s so much cheaper than using cooking spray, and it works better with no chemical fumes! It does not leave the icky weird, black residue on the edges of your pans like cooking spray and it makes clean up a breeze!
To be honest, I have never been a fan of cooking spray. Although I often list that as an option in the recipes I share, I usually do it the old-fashioned way. I coat my bakeware with shortening/butter, or line it with parchment paper. Most of the time, I use my trusty Silpat. Don’t get me wrong, I have used cooking spray in the past – and I’m not knocking you if you use it! Personally, I try to stay away from it now. I hate the residue it leaves on my pots/pans and bakeware – and let’s be honest, it can be hard as heck to get off of your stuff. I have had to trash countless baking pans because of using cooking spray on them. Remember I said I’m a cheap-o?! I hate wasting money like that!

Growing up, I remember my mom greasing and flouring pans to bake with – and for a long time, I did this too. When a friend told me about her miracle pan release, I was sold, and I have never looked back!
An easy alternative to cooking spray
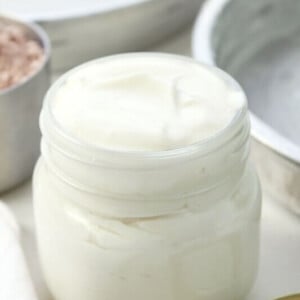
Seriously, this stuff is amazing. Nothing sticks! It’s easy to keep on hand with stuff you probably already have in your pantry (only three ingredients!) – and you can easily make more or less just by remembering to keep the proportions equal! In the recipe I share, I used a half of a cup of each ingredient – which fills a half-pint sized mason jar. If you don’t bake as much, you may only want to use a quarter of a cup of each ingredient.
I use this stuff for all of my cakes and I love how easy it makes everything! The cakes literally just slide right out of the pan – making cleaning them easy too! The best part? I’m not throwing away my bakeware and having to replace it because of all of the built-up gunk from cooking spray!


Other Posts You May Enjoy:
Would you like to save this?


Miracle Pan Release
Would you like to save this?
Ingredients
- ½ cup all-purpose flour
- ½ cup vegetable shortening
- ½ cup vegetable oil
Instructions
- In a medium bowl, combine all ingredients with a hand mixer until the mixture slightly increases in volume and the mixture looks smooth and creamy.
- Place in a covered container and store on counter top or in the pantry.
To use:
- Use a pastry brush, clean paper towel or clean fingers to coat the inside of baking pans before baking. Use within 3-4 months or store in refrigerator for longer use.
Video
Notes
- You can easily adjust this to make larger or smaller batches! Use the same measure for all three ingredients to increase or decrease amounts.
- Example measure if you need less – 1 Tablespoon each all-purpose flour, vegetable shortening, and vegetable oil.
- Example measure if you need more – 1 cup each all-purpose flour, vegetable shortening, and vegetable oil.
Nutrition
Nutrition information is automatically calculated, so should only be used as an approximation.

Best pan release I have tried Thank-you
I can confirm that it’s possible to make a healthy version of this. I used extra virgin, cold-pressed coconut oil at room temperature, it still had a firm-ish texture but was soft. I whipped freshly milled whole millet & oat grain into it. It ended up looking like caramel ice cream (pic on my IG). It worked a charm on my my cheap dollar store baking pans. I used a sticky gluten-free dough made from freshly milled grain, so it was challenge and it passed with flying colors! No need to use the processed ingredients of the original recipe. They might work but from a nutritional point of view it seems a shame to put them in your yummy home cooked food.