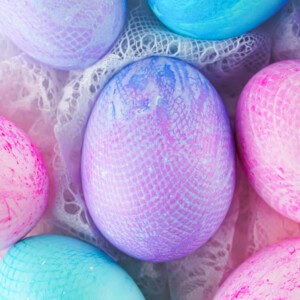
Fabric-Textured Easter Eggs
Create beautiful Fabric-Textured Easter Eggs using lace, mesh, or burlap! A fun and easy DIY that adds unique patterns and color to your Easter decor. 🐣✨
Would you like to save this?
Materials
- 6x10-inch pieces of textured fabric (lace, burlap, netting, or poly mesh ribbon)
- rubber bands
- paper towels
- scissors
Ingredients
- hard-boiled eggs
- egg dye, store-bought or homemade
Instructions
- Prepare the Dye. Mix your egg dye according to the instructions. I used food coloring, which can be very strong, so a little goes a long way.
- Wrap the Egg. Tightly wrap a piece of fabric around your egg. Secure it at the top with a rubber band. Make sure the fabric is pressed snugly against the shell - it helps create a clearer design.
- Dye the Egg. Dip the wrapped egg fully into the dye. Leave it for about 30 seconds - or even less if the dye is strong. The longer it sits, the deeper the color and the more it may blur the design.
- Dry the Egg. Remove the egg and gently pat it dry with a paper towel. Let it sit for about 2 minutes.
- Unwrap. Carefully cut away the fabric wrap.
- Final Dry. Pat dry again and let the egg rest for 3 more minutes.
- Repeat and Enjoy! Keep going with as many eggs as you like.
Notes
- Hard-boiled eggs last about a week in the fridge.
Tips for Success
- The tighter the fabric, the clearer the pattern.
- Don’t leave the egg in the dye too long - 30 seconds or less is ideal.
- Always pat dry before removing the fabric to preserve the design.
- Test one egg first to figure out the best dye time.
Like this? Leave a comment below!
